Castle Print & Design

Commercial printing for businesses throughout the UK & Europe.

  • E-mail
  • Facebook
  • business-cards-icons-Bonne Maman Logo
  • business-cards-icons-Ecover_logo
  • business-cards-icons-EPC_logo
  • business-cards-icons-FF-logo
  • business-cards-icons-halle-logo
  • business-cards-icons-harley
  • business-cards-icons-Hipp
  • business-cards-icons-HMV
  • business-cards-icons-jet2
  • business-cards-icons-LIB
  • business-cards-icons-Littlewoods
  • business-cards-icons-Marks__and__Spencer
  • business-cards-icons-marley
  • business-cards-icons-Mencap
  • business-cards-icons-NHS
  • business-cards-icons-RD_LOGO
  • business-cards-icons-samsung
  • business-cards-icons-Seat
  • business-cards-icons-Tesco
  • business-cards-icons-The_Open_University
  • business-cards-icons-thyssen-krupp
  • business-cards-icons-vbulletin
  • business-cards-icons-Vodafone
  • Home
  • Select A Product
    • Booklet Printing
    • Brochures & Leaflets
    • BUSINESS CARDS >> select for more options
      • Shaped Business Cards (die cut)
      • Laminated Business Cards
      • Spot Colour Business Cards
      • Spot UV Business Cards
      • Thermo Business Cards
    • Canvas Prints by Migglet
    • Continuous Stationery
    • Digital Printing Service
    • Envelope Printing
    • Folder Printing
    • Forms Printing (NCR)
    • Label / Sticker Printing
    • Letterhead Printing
    • Wedding Stationery
  • Other site info
    • About Us
    • Artwork & Design
    • Copyright Information
    • Envelope Sizes UK
    • FAQ’s
      • Artwork – FAQ’s
      • Business Cards – FAQ’s
      • General – FAQ’s
    • Glossary of Printing Terms UK
    • Legal requirements for your stationery – Page 1
      • Legal requirements for your stationery – page 2
    • Paper Sizes UK
    • Privacy
    • Setting up your office to use continuous forms
    • Sitemap
    • Stock Photos
    • Trade Printing
    • Write For Us
  • Articles & Tutorials
    • PRINT ARTICLES >>
      • 11 Benefits of Online Printing Services
      • Are Your Labels Selling Your Brand?
      • Booklet Printing & Publishing | Booklet Planning
      • Building Business Presence with Digital Printing
      • Business Brochure Printing: Picking The Perfect Paper
      • Choosing The Right Business Card Material
      • Colour Issues | Working in Spot & Process Colour
      • Digital, or Litho – How Do I Choose?
      • Fonts & Typefaces Explained
      • Free Business Cards – a bargain right?
      • How To Apply Printed Vinyl | Wet & Dry Methods
      • How to Design and Print Your Own Business Card Using ‘Pages’
      • How to Design a Photo ID Card that Reduces Card Cloning Attempts
      • How Visual Retail Merchandising Catches Your Attention in 2018
      • Logo Design
      • Print vs Digital Media – The Death of Print?
      • Print Technology
      • Proof That Print Is Not Dead | Most Consumers Still Prefer Print on Paper
      • QR Code Printing
      • Rich Black Explained | Using Rich Blacks In Your Artwork
      • Setting Up Your Office To Use Continuous Forms
      • Spot and Process Colours Explained
      • Thermo Process Explained
      • Understanding The Importance of Business Printing For Brand Promotion
      • Website Design
      • Web Design to Print Design – Making The Transition
      • What Makes A Logo Stand The Test of Time?
    • PRINT TUTORIALS >>
      • How To Design A Ghost Image
      • How To Design An A4 Folded Leaflet
      • How to Design a Business Card
      • How to design a Letterhead
      • Preparing A Print File In Adobe In-Design
      • How To Design A Pull Up Banner In Adobe InDesign
      • Text to Outlines – how to convert text into outlines
    • PHOTOSHOP HOW TO >>
      • How to Design an Alien Head Logo
      • How To Design A Pencil
      • How To Create Metal Text With Bloodstain Effect
      • How To Create Rusty Text with Holes
      • How to create Glossy Buttons
      • How to create a simple, clean content box
      • How To Preserve Spot Colours in Photoshop
      • How to create a Disney Navigation Interface Design
      • How To Design Custom Fitted Logos
      • How to create a Futuristic Logo Design
      • How to Design a Metallic Content Box
      • How to create a Clipboard Design
      • How to create an Industrial Text Effect
      • How to create an iRiver design
      • How to create a Professional Blog Template Design
      • How to create a Robot Head design
    • REVIEWS >>
      • Buying & Selling Art | ArtShowcase Review
      • Top 10 Best All In One Laser Multi-Function Printers
Home Articles & Tutorials Text to Outlines – how to convert text into outlines

August 20, 2015 By castle Leave a Comment

Text to Outlines – how to convert text into outlines

It’s common practice when using a program such as Adobe In-Design/Illustrator etc. to convert all text to outlines. This is especially so when an unusual font has been used in the artwork, which the print shop may not have on their system. Outlining fonts makes all text non-editable, so make sure you have an editable copy saved somewhere safe.

Time needed: 5 minutes.

  1. Text to Outlines

    It’s a very straightforward procedure as follows:
    With either one of the pointer arrows selected in the main toolbar:
    Text to outlines

  2. Select All Type

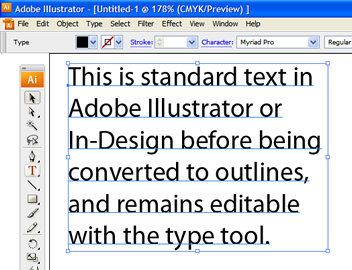
    Select all type in your document – ‘Select All’ (Ctrl A)

    Converting text to outlines - example 1

  3. Main Menu

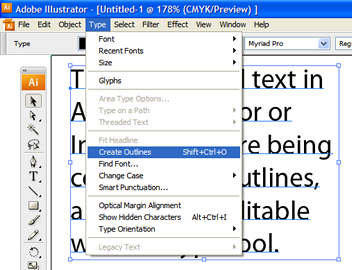
    and then goto ‘Type‘ in the main menu and select ‘Create Outlines‘.

    Converting text to outlines - example 2

  4. Text Now Graphics

    You’ll notice that every text character is now converted into a single standalone graphic.

    (The text below looks rough only because it is still selected).

    When you click on some whitespace on your artboard, the text will de-select and look ‘normal’.

    Converting text to outlines - example 3

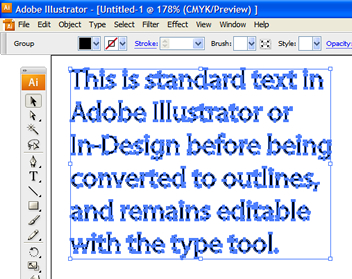
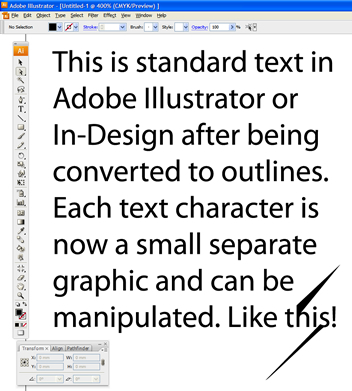
  5. Manipulating Converted Text

    Select the 2nd arrow, (the white one) and you’ll be able to manipulate your newly-converted text any which way you like.

    Text to outlines

  6. Example

    Converting text to outlines - example 4

Creating a logo

Incidentally, you can now see one way of creating logos. Find a suitable typeface, type in your lettering required for the logo, convert text to outlines and you now can stretch or play with the graphic to your heart’s content.

If there’s something that needs explaining in the above article, or you any have tips / shortcuts of your own regarding text to outlines, then please leave a message in the comments section below.

Related Posts

  • How to design a Ghost Image
  • Preparing A Print File In Adobe In-Design
  • What Makes A Logo Stand The Test of Time?

Filed Under: Articles & Tutorials Tagged With: creating outlines in text, Text to outlines

Leave a Reply Cancel reply

Your email address will not be published. Required fields are marked *

Useful Site Links

Paper Sizes UK
Envelope Sizes UK
Glossary of Print Terms UK
Spot & Process Colours Explained
Legal Requirements - Stationery
Copyright Information
Trade Printing Service

Search the Site

Copyright © 2021 Castle Print & Design - all rights reserved

Bleeds explained

Basically, a bleed is artwork that goes over the edge of the printed sheet.

If your design needs to have a bleed then it’s important to allow 3mm overlap (see image A below). As the letterhead will be printed on oversize material (SRA4), this gives the guillotine operator a chance to cut into the artwork and produce a good finished letterhead. (see image B below).

A
How to design a letterhead fig. 3
B
How to design a letterhead fig. 4

Why do we need a bleed?

If the artwork ended at the edge of the sheet and the guillotine cut was only 0.5mm out, then we could end up with an unsightly thin white strip down one edge of the sheet, which is not ideal.

Also, if there is a large stack of paper on the press, with the best will in the world there will be the odd sheet that doesn’t get fed through the press 100% accurately so if a bleed hasn’t been put in place this could cause issues.

Extending the artwork over the edge of the sheet allows for a little leeway when it comes to the time for trimming.

If you’ve set your workspace for A4 and intend to use bleeds then, depending on what software package you are using you may need to set the workspace to oversize A4 (SRA4), which measures 225mm x 320mm.

We use cookies to ensure that we give you the best experience on our website. If you continue to use this site we will assume that you are happy with it.Ok