Castle Print & Design

Commercial printing for businesses throughout the UK & Europe.

  • E-mail
  • Facebook
  • business-cards-icons-Bonne Maman Logo
  • business-cards-icons-Ecover_logo
  • business-cards-icons-EPC_logo
  • business-cards-icons-FF-logo
  • business-cards-icons-halle-logo
  • business-cards-icons-harley
  • business-cards-icons-Hipp
  • business-cards-icons-HMV
  • business-cards-icons-jet2
  • business-cards-icons-LIB
  • business-cards-icons-Littlewoods
  • business-cards-icons-Marks__and__Spencer
  • business-cards-icons-marley
  • business-cards-icons-Mencap
  • business-cards-icons-NHS
  • business-cards-icons-RD_LOGO
  • business-cards-icons-samsung
  • business-cards-icons-Seat
  • business-cards-icons-Tesco
  • business-cards-icons-The_Open_University
  • business-cards-icons-thyssen-krupp
  • business-cards-icons-vbulletin
  • business-cards-icons-Vodafone
  • Home
  • Select A Product
    • Booklet Printing
    • Brochures & Leaflets
    • BUSINESS CARDS >> select for more options
      • Shaped Business Cards (die cut)
      • Laminated Business Cards
      • Spot Colour Business Cards
      • Spot UV Business Cards
      • Thermo Business Cards
    • Canvas Prints by Migglet
    • Continuous Stationery
    • Digital Printing Service
    • Envelope Printing
    • Folder Printing
    • Forms Printing (NCR)
    • Label / Sticker Printing
    • Letterhead Printing
    • Wedding Stationery
  • Other site info
    • About Us
    • Artwork & Design
    • Copyright Information
    • Envelope Sizes UK
    • FAQ’s
      • Artwork – FAQ’s
      • Business Cards – FAQ’s
      • General – FAQ’s
    • Glossary of Printing Terms UK
    • Legal requirements for your stationery – Page 1
      • Legal requirements for your stationery – page 2
    • Paper Sizes UK
    • Privacy
    • Setting up your office to use continuous forms
    • Sitemap
    • Stock Photos
    • Trade Printing
    • Write For Us
  • Articles & Tutorials
    • PRINT ARTICLES >>
      • 11 Benefits of Online Printing Services
      • Are Your Labels Selling Your Brand?
      • Booklet Printing & Publishing | Booklet Planning
      • Building Business Presence with Digital Printing
      • Business Brochure Printing: Picking The Perfect Paper
      • Choosing The Right Business Card Material
      • Colour Issues | Working in Spot & Process Colour
      • Digital, or Litho – How Do I Choose?
      • Fonts & Typefaces Explained
      • Free Business Cards – a bargain right?
      • How To Apply Printed Vinyl | Wet & Dry Methods
      • How to Design and Print Your Own Business Card Using ‘Pages’
      • How to Design a Photo ID Card that Reduces Card Cloning Attempts
      • How Visual Retail Merchandising Catches Your Attention in 2018
      • Logo Design
      • Print vs Digital Media – The Death of Print?
      • Print Technology
      • Proof That Print Is Not Dead | Most Consumers Still Prefer Print on Paper
      • QR Code Printing
      • Rich Black Explained | Using Rich Blacks In Your Artwork
      • Setting Up Your Office To Use Continuous Forms
      • Spot and Process Colours Explained
      • Thermo Process Explained
      • Understanding The Importance of Business Printing For Brand Promotion
      • Website Design
      • Web Design to Print Design – Making The Transition
      • What Makes A Logo Stand The Test of Time?
    • PRINT TUTORIALS >>
      • How To Design A Ghost Image
      • How To Design An A4 Folded Leaflet
      • How to Design a Business Card
      • How to design a Letterhead
      • Preparing A Print File In Adobe In-Design
      • How To Design A Pull Up Banner In Adobe InDesign
      • Text to Outlines – how to convert text into outlines
    • PHOTOSHOP HOW TO >>
      • How to Design an Alien Head Logo
      • How To Design A Pencil
      • How To Create Metal Text With Bloodstain Effect
      • How To Create Rusty Text with Holes
      • How to create Glossy Buttons
      • How to create a simple, clean content box
      • How To Preserve Spot Colours in Photoshop
      • How to create a Disney Navigation Interface Design
      • How To Design Custom Fitted Logos
      • How to create a Futuristic Logo Design
      • How to Design a Metallic Content Box
      • How to create a Clipboard Design
      • How to create an Industrial Text Effect
      • How to create an iRiver design
      • How to create a Professional Blog Template Design
      • How to create a Robot Head design
    • REVIEWS >>
      • Buying & Selling Art | ArtShowcase Review
      • Top 10 Best All In One Laser Multi-Function Printers
Home Photoshop Tutorials How to Design a Metallic Content Box | Photoshop Tutorial

October 15, 2015 By castle Leave a Comment

How to Design a Metallic Content Box | Photoshop Tutorial

Metallic Content Box

How to Design a Metallic Content Box

Step 1:
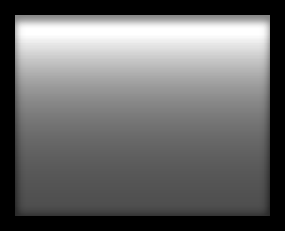
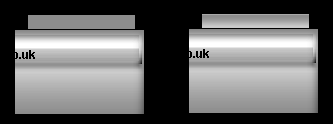
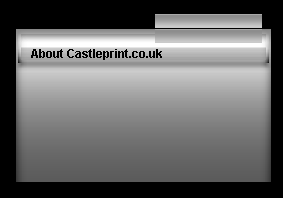
Let’s start out by creating a new file. I used a 500×400 pixels canvas set at 72dpi, and I filled my background with a black color. Now create a new layer set and name it ‘Metallic Content Box’. In a new layer draw a rectangle with 255×201 px dimensions and #4D4D4D color shade.
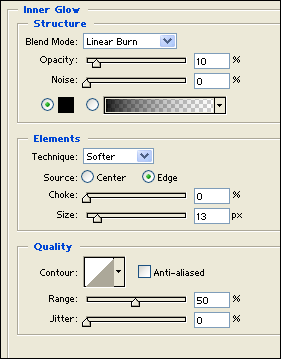
Metallic Content Box 2

Step 2:
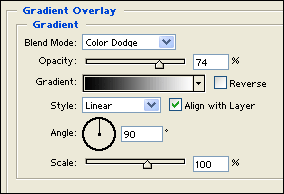
Under Layer Style(Layer > Layer Style) add an Inner Shadow, Inner Glow, and Gradient Overlay blending options to your dark gray rectangle layer.

Metallic Content Box 3

Metallic Content Box 4

Metallic Content Box 5

Metallic Content Box 6

Step 3:
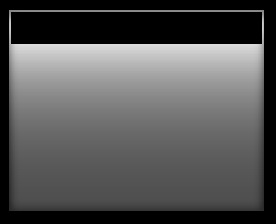
Now draw a black rectangle with 251×32 px dimensions along the top end of your content box.
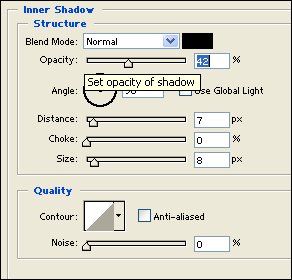
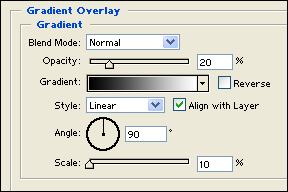
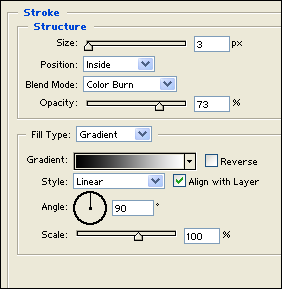
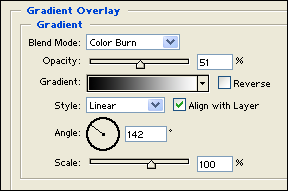
Metallic Content Box 7

Step 4:
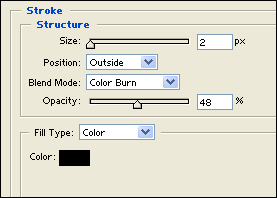
Under Layer Style(Layer > Layer Style) add a Drop Shadow, Gradient Overlay and Stroke blending options to your black rectangle layer. Then set the layer’s blending mode to Soft Light.
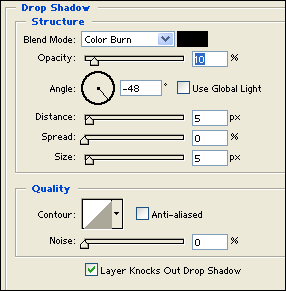
Metallic Content Box 8

Metallic Content Box 9

Metallic Content Box 10

Metallic Content Box 11


Step 5:
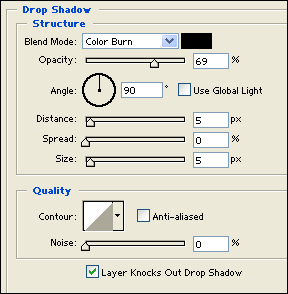
Create a new layer and draw a white rectangle with 30 x 26 px dimensions on the bottom right corner of your content box. Then under Layer Style(Layer > Layer Style) add a Drop Shadow and Gradient Overlay blending option.

Metallic Content Box 12

Metallic Content Box 13

Metallic Content Box 14

Step 6:
Choose the Horizontal Type Tool and set the font family to Arial, bold, 12 pt, none and black color shade. In a new text layer type the name of your content box on the glossy rectangle.
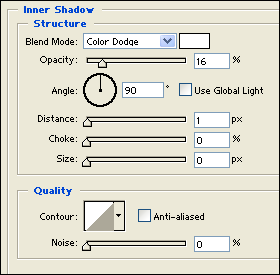
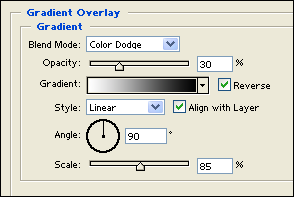
Metallic Content Box 15

Step 7:
Create a new layer and draw a gray rectangle with #8D8D8D color shade and 106 x 14 px dimensions above the content box on the right end. Then under Layer Style(Layer > Layer Style) add an Inner Shadow and Gradient Overlay blending option.

Metallic Content Box 16

Metallic Content Box 17

Metallic Content Box 18

Step 8:
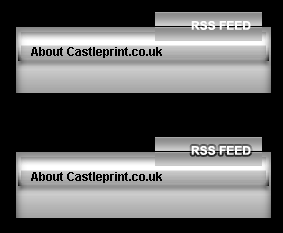
Duplicate the small rectangle design from the last step and position it down under to make a unique tab button.

Metallic Content Box 19

Step 9:
Choose the Horizontal Type Tool and set the font family to Arial, bold, 12 pt, strong and white color shade. In a new text layer type ‘RSS FEED’ on the tab design above your content box. Then under Layer Style(Layer > Layer Style) add a Stroke blending option.
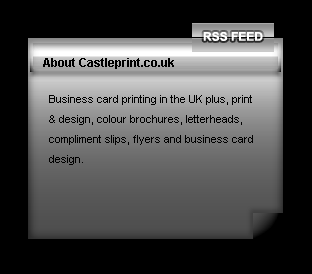
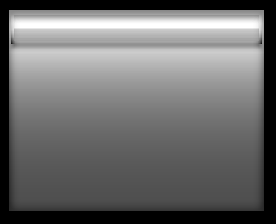
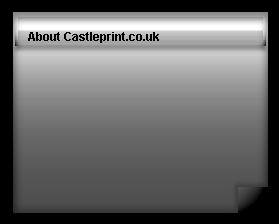
Metallic Content Box 20

Metallic Content Box 21

Results:

Metallic Content Box

Metallic Content Box


Related Posts

  • How to Design an Alien Head Logo | Photoshop Tutorial
  • How To Design A Pencil | Photoshop Tutorial
  • How to create Metal Text with Bloodstain effect | Photoshop Tutorial
  • How to create Rusty Text with Holes | Photoshop Tutorial
  • How to create Glossy Buttons | Photoshop Tutorial
  • How to create a content box in Photoshop | Photoshop Tutorial
  • How To Preserve Spot Colours in Photoshop
  • How to create a Professional Blog Template Design | Photoshop Tutorial
  • How to create a Disney Navigation Interface Design | Photoshop Tutorial
  • How To Design Custom Fitted Logos | Photoshop Tutorial
  • How to create a Futuristic Logo Design | Photoshop Tutorial
  • How to create a Clipboard Design | Photoshop Tutorial
  • How to create an Industrial Text Effect | Photoshop Tutorial
  • How to create an iRiver design | Photoshop Tutorial
  • How to create a Robot Head design | Photoshop Tutorial

Filed Under: Photoshop Tutorials Tagged With: How to Design a Metallic Content Box, Metallic Content Box, Photoshop Tutorial

Leave a Reply Cancel reply

Your email address will not be published. Required fields are marked *

Useful Site Links

Paper Sizes UK
Envelope Sizes UK
Glossary of Print Terms UK
Spot & Process Colours Explained
Legal Requirements - Stationery
Copyright Information
Trade Printing Service

Search the Site

Copyright © 2022 Castle Print & Design - all rights reserved

Bleeds explained

Basically, a bleed is artwork that goes over the edge of the printed sheet.

If your design needs to have a bleed then it’s important to allow 3mm overlap (see image A below). As the letterhead will be printed on oversize material (SRA4), this gives the guillotine operator a chance to cut into the artwork and produce a good finished letterhead. (see image B below).

A
How to design a letterhead fig. 3
B
How to design a letterhead fig. 4

Why do we need a bleed?

If the artwork ended at the edge of the sheet and the guillotine cut was only 0.5mm out, then we could end up with an unsightly thin white strip down one edge of the sheet, which is not ideal.

Also, if there is a large stack of paper on the press, with the best will in the world there will be the odd sheet that doesn’t get fed through the press 100% accurately so if a bleed hasn’t been put in place this could cause issues.

Extending the artwork over the edge of the sheet allows for a little leeway when it comes to the time for trimming.

If you’ve set your workspace for A4 and intend to use bleeds then, depending on what software package you are using you may need to set the workspace to oversize A4 (SRA4), which measures 225mm x 320mm.