
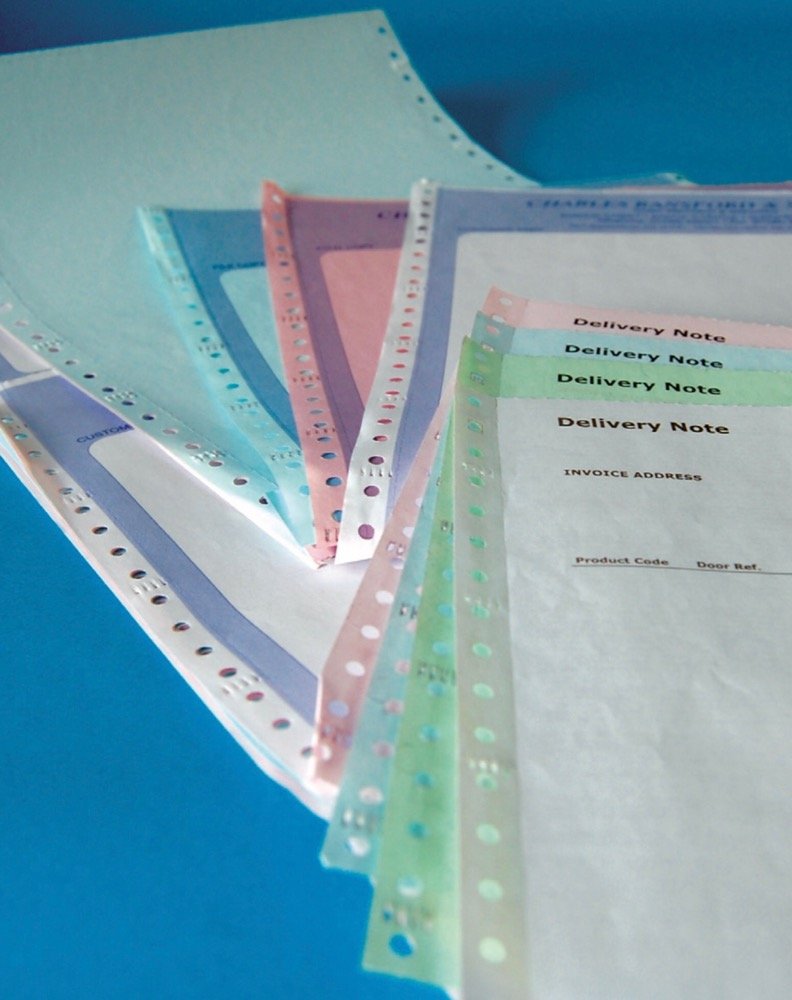
Continuous forms are multi-parts ‘sets’, that are fed through a dot matrix printer. Each ‘set’ of the form, could be 1, 2, 3 or 4 pages that are crimped together and, using the familiar perforated strip down each side, are then fed through the printer.
The form is designed to work with your regular accounting software, such as Sage®.
If your form is to be filled out by hand, a delivery note for instance, then you only require a standard NCR (no carbon required) ‘cut sheet’ form. In other words, a regular form that has no tear-off perforated strip down the sides.
If this applies to you, then please see our regular Forms Print page.
Further Info
The most common size used for Invoices, Remittance Advice, Credit Notes etc. is 9½”wide x 11″deep. This form would tear down (after removal of the strips at the side holding the sprocket holes) to 8½” wide x 11″deep.
Most companies request their Terms & Conditions are printed on the reverse of the top part (this is usually the Customer copy and generally printed on a white top copy sheet). We would normally print the Terms & Conditions in a grey ink, so as not to show through the sheet and interfere with the all-important info printed on the face.
If the printing on the face of the sheets is the same on all copies, we call this ‘All Parts Common‘.
Sometimes Cross-Hatching (basically an image that blanks out part of the form) is used on one of the bottom sheets. The bottom sheet for instance could be exactly the same layout (common) as the sheets above but it may be titled Despatch Note and the boxes that hold the sensitive pricing information is ‘blanked out’ with cross-hatching. This means you do not need a separate form for your Despatch Notes which helps to keep costs down.
Continuous Stationery Forms can be designed in-house to any style or template you wish.
If you are using an existing Sage® or Pegasus® continuous stationery form, (in fact any form design can be replicated), and would like your logo and details added then this is very easy to do.
Some of the most common forms in the continuous stationery section are:
Continuous Stationery
- Invoices
- Statements
- Order Forms
- Delivery Notes
- Credit Notes
- Remittance Advice
- A4 continuous Letterheads etc.
1 or multiple colours and 1 part or multiple part sets.
Also available are Integrated Forms, i.e. continuous forms with removable peel-out labels.
[wpanchor id=”continuous”]
Setting up your office to use continuous forms
If you’ve never used continuous forms before then here’s how to get started:
Firstly you’ll need a dot-matrix printer, (also known as an ‘impact’ printer). This type of printer uses an inked ribbon and each character is in effect hammered onto the paper by tiny pins on the print head. The more pins on the head, the better the resolution (quality) of the final print.
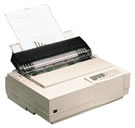
Entry level is 9 pins but for regular use 24 pins will give better results. This impact creates enough force to make an impression through a few sheets of carbonated paper.
Here are a few options that may suit your needs . . .
Software
To use a dot-matrix printer any software that allows you to print can be used (pretty much everything). You can load the printer with plain sheets, or sheets already printed with a form design.
If using a program such as Sage® for your accounts, then this will ship with many standard templates of different sized forms. For instance, an average invoice size is 11″ x 9½”. When the form has been printed you’ll be left with a perforated strip on the left and right edges, (with sprocket holes the printer uses for guiding the paper). These are usually torn off leaving nice clean edges. Each strip measure ½”, so the final size of the form will be 11″ x 8½”.
Statement/Remittance Advice Notes will be usually much wider, often with a vertical perforation allowing the remittance section to be removed at the client end which is hopefully posted back to you with a payment!
If using a program such as Sage® you will have the facility to modify all templates to suit your needs. The templates are populated with all the basic details you’ll need, however if you are having a form designed then much of the detail will be pre-printed enabling you to delete out the unnecessary bits in your Sage® template.
A4 Size
Many companies prefer to send out invoices on their letterheads, and an A4 size (after tearing off the sprocket strips) is available. In this instance we would use ‘micro-perfs’. With micro-perfs the holes that are used for tearing off the side strips are much smaller and closer together which gives a far neater effect so is perfect for continuous A4 letterheads.
Paper
When ordering continuous stationery for the first time, think carefully about how many ‘parts’ you’ll need. The top copy, which is usually white would probably go to the customer. The 2nd copy, (which could be blue, green, yellow or pink for instance) is usually filed with the customer folder, the 3rd part could be filed in accounts etc. so only order what you think you’ll use or otherwise you could end up throwing the bottom sheet away which is an unnecessary expense.
Keeping Costs Down
If your main stationery is produced in 2 or more colours, consider having your logo produced in 1 colour for invoices, despatch notes, etc. as this will greatly reduce the cost of your continuous stationery. Converting your logo to 1 colour is very easy, and there is usually no cost involved to do this on your behalf.
Artwork
It is recommended that unless you have professional software, such as QuarkXpress®, Adobe In-Design®, Adobe Illustrator® etc. it’s best not to attempt the design of the form yourself as this needs to be done very accurately. A dot matrix printer has fixed spacing between lines of text, and this needs to be factored in when designing a form. Programs such as Word®, Publisher®, Photoshop®, Gimp® etc. are not suitable for form design.
Continuous Stationery FAQ’s
Can you explain what you mean about spot colour and process colours?
Will the colour(s) I see on a PDF proof print exactly as I see them onscreen?
Generally, no! Some colours are fairly representative whereas others are a long way off. The monitor you view your proof on is a device that mixes colours using red, green and blue (RGB). Without getting too technical, if your monitor has not been calibrated to display a Pantone® colour, then it’s unlikely you will see an accurate representation.
If choosing one or more specific spot colours (for branding purposes etc.) then it’s essential the colours are chosen from a printed Pantone® swatch, unless you know your screen is accurately calibrated.
An example – if you were to select Pantone® Violet in your graphics program, it’s very likely that this will show as a ‘blue’ onscreen. If you were then to look at Pantone® Violet in a Pantone® swatch you’ll see that the true colour is actually a rich purple. It follows that if you’d selected this colour for your design from what you see onscreen (blue), then it’s very likely that you won’t be happy with the final printed results (purple).
Legally, what do I need to put on my letterheads and other stationery?
Please visit this page for more info: Legal Stuff For Stationery

