This tutorial is aimed at helping you position your artwork so it can be correctly folded.
Dividing an A4 sheet into 3 equal parts will not give you the correct folds, as we need to allow room for the front cover to overlap the other parts.
How to plan an A4 leaflet/flyer for folding
- Rulers
Turn on rulers in your design package (often Ctrl. R), and set the top left hand corner to: x = 0, y = 0. This will help you to position the margin guides.
- Workspace
Start by setting your workspace to A4 and position your non-printing guides as shown in the diagram below. These guides are where you want the job to be folded.
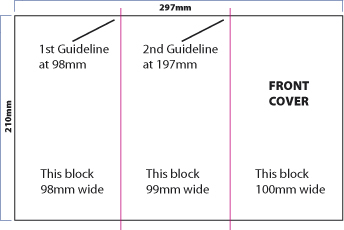
Tip. If you’re not familiar with using rulers, then simply create a picture or text box 98mm wide and position the left edge to your workspace. You can then draw a guide down the right hand side of this box. Repeat this process with a box of 99mm width for your 2nd guide. The remaining space should then measure 100mm.
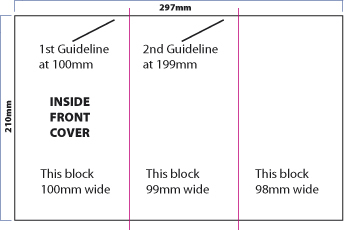
For the inside of the leaflet, it’s just a case of reversing the measurements. - Block Sizes
The left hand block, which now becomes the inside of the front cover, (see below), will measure 100mm. The centre block will measure 99mm, leaving the final block on the right hand side as 98mm.
- Margins
To get a neat, professional-looking job it’s important to use margins. Depending on how much content you have then a good starting point is to use 10mm margins.
- Guides
Use more guides to show the margins, as in below. Start by having a 10mm margin around the whole of the A4 sheet and then position further 10mm margins before and after your guidelines.
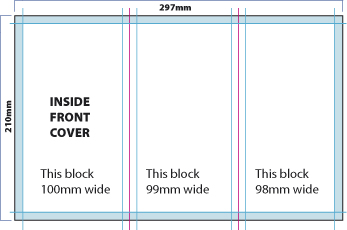
We now have a 10mm margin around the whole of our A4 sheet, plus the same margin either side of the guidelines.
Don’t forget to add your margins to the front of your leaflet. - Final Steps
You are now ready to add content to both sides of your leaflet.
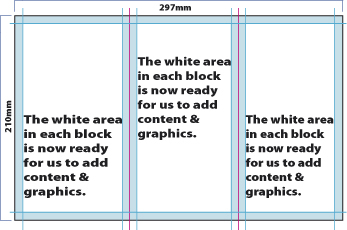
Many artworkers will position short dotted lines, just above and below the artwork, to mark the position of the folds.
Hope this helps with How to design an A4 folded leaflet.

Leave a Reply