Castle Print & Design

Commercial printing for businesses throughout the UK & Europe.

  • E-mail
  • Facebook
  • business-cards-icons-Bonne Maman Logo
  • business-cards-icons-Ecover_logo
  • business-cards-icons-EPC_logo
  • business-cards-icons-FF-logo
  • business-cards-icons-halle-logo
  • business-cards-icons-harley
  • business-cards-icons-Hipp
  • business-cards-icons-HMV
  • business-cards-icons-jet2
  • business-cards-icons-LIB
  • business-cards-icons-Littlewoods
  • business-cards-icons-Marks__and__Spencer
  • business-cards-icons-marley
  • business-cards-icons-Mencap
  • business-cards-icons-NHS
  • business-cards-icons-RD_LOGO
  • business-cards-icons-samsung
  • business-cards-icons-Seat
  • business-cards-icons-Tesco
  • business-cards-icons-The_Open_University
  • business-cards-icons-thyssen-krupp
  • business-cards-icons-vbulletin
  • business-cards-icons-Vodafone
  • Home
  • Select A Product
    • Booklet Printing
    • Brochures & Leaflets
    • BUSINESS CARDS >> select for more options
      • Shaped Business Cards (die cut)
      • Laminated Business Cards
      • Spot Colour Business Cards
      • Spot UV Business Cards
      • Thermo Business Cards
    • Canvas Prints by Migglet
    • Continuous Stationery
    • Digital Printing Service
    • Envelope Printing
    • Folder Printing
    • Forms Printing (NCR)
    • Label / Sticker Printing
    • Letterhead Printing
    • Wedding Stationery
  • Other site info
    • About Us
    • Artwork & Design
    • Copyright Information
    • Envelope Sizes UK
    • FAQ’s
      • Artwork – FAQ’s
      • Business Cards – FAQ’s
      • General – FAQ’s
    • Glossary of Printing Terms UK
    • Legal requirements for your stationery – Page 1
      • Legal requirements for your stationery – page 2
    • Paper Sizes UK
    • Privacy
    • Setting up your office to use continuous forms
    • Sitemap
    • Stock Photos
    • Trade Printing
    • Write For Us
  • Articles & Tutorials
    • PRINT ARTICLES >>
      • 11 Benefits of Online Printing Services
      • Are Your Labels Selling Your Brand?
      • Booklet Printing & Publishing | Booklet Planning
      • Building Business Presence with Digital Printing
      • Business Brochure Printing: Picking The Perfect Paper
      • Choosing The Right Business Card Material
      • Colour Issues | Working in Spot & Process Colour
      • Digital, or Litho – How Do I Choose?
      • Fonts & Typefaces Explained
      • Free Business Cards – a bargain right?
      • How To Apply Printed Vinyl | Wet & Dry Methods
      • How to Design and Print Your Own Business Card Using ‘Pages’
      • How to Design a Photo ID Card that Reduces Card Cloning Attempts
      • How Visual Retail Merchandising Catches Your Attention in 2018
      • Logo Design
      • Print vs Digital Media – The Death of Print?
      • Print Technology
      • Proof That Print Is Not Dead | Most Consumers Still Prefer Print on Paper
      • QR Code Printing
      • Rich Black Explained | Using Rich Blacks In Your Artwork
      • Setting Up Your Office To Use Continuous Forms
      • Spot and Process Colours Explained
      • Thermo Process Explained
      • Understanding The Importance of Business Printing For Brand Promotion
      • Website Design
      • Web Design to Print Design – Making The Transition
      • What Makes A Logo Stand The Test of Time?
    • PRINT TUTORIALS >>
      • How To Design A Ghost Image
      • How To Design An A4 Folded Leaflet
      • How to Design a Business Card
      • How to design a Letterhead
      • Preparing A Print File In Adobe In-Design
      • How To Design A Pull Up Banner In Adobe InDesign
      • Text to Outlines – how to convert text into outlines
    • PHOTOSHOP HOW TO >>
      • How to Design an Alien Head Logo
      • How To Design A Pencil
      • How To Create Metal Text With Bloodstain Effect
      • How To Create Rusty Text with Holes
      • How to create Glossy Buttons
      • How to create a simple, clean content box
      • How To Preserve Spot Colours in Photoshop
      • How to create a Disney Navigation Interface Design
      • How To Design Custom Fitted Logos
      • How to create a Futuristic Logo Design
      • How to Design a Metallic Content Box
      • How to create a Clipboard Design
      • How to create an Industrial Text Effect
      • How to create an iRiver design
      • How to create a Professional Blog Template Design
      • How to create a Robot Head design
    • REVIEWS >>
      • Buying & Selling Art | ArtShowcase Review
      • Top 10 Best All In One Laser Multi-Function Printers
Home Photoshop Tutorials How To Preserve Spot Colours in Photoshop

October 6, 2015 By castle Leave a Comment

How To Preserve Spot Colours in Photoshop

How to preserve Spot Colours in Photoshop

How To Preserve Spot Colours in Photoshop (vs. 6 and higher)

1. Save the Practice File

How many times have you wondered why, no matter how much you save spot colours in other applications, you cannot preserve a spot color in Photoshop? There is a way of course, and this is what this article will cover.

This tutorial has been made using Photoshop CS for Mac, but it should be OK also for previous versions of Photoshop up to version 6, and of course also for whoever has the Windows version of Photoshop. This is not the only method to use spot colors in Photoshop, but it is a simple one which you could find useful.

To do this tutorial, download the file spottest.zip (right click the link and choose save) then extract it using a program like StuffIt Expander (free download for Mac/Windows).

You will need the included spottest.eps file to follow along with this tutorial.

Let’s say you have done a graphics in Illustrator and for some reason you need to open it in Photoshop to apply certain effects, but you still need to keep your spot colour.

In this image the rectangle and the ellipses are filled with CMYK colours, while the orange star is filled with Pantone Orange. It was originally done with Illustrator and I have now opened it with Photoshop.

How to preserve Spot Colours in Photoshop 2

2. Open the Channels Palette

The first thing you do, is to open your Channels palette.

Go to Window > Channels.

How to preserve Spot Colours in Photoshop 3

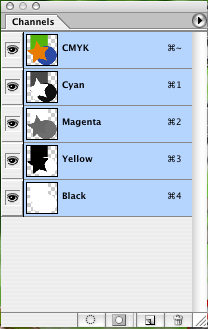
In the Channels palette menu you will see that Yellow is the channel which has the most color for the star. So drag the yellow channel thumbnail onto the New Channel icon at the bottom of your Channels palette. A new channel called Yellow Copy will appear in the Channels palette.

Now, don’t worry if your graphics looks black and white, this is because you are not viewing all of the channels that compose your image, but only the Yellow Copy channel. Just click on the CMYK thumbnail in order to see all of your colors again. Now that you have an additional yellow channel though, your colors will look different, but still don’t worry, we have not finished yet.

3. Set the Channel Options

How to preserve Spot Colours in Photoshop 4

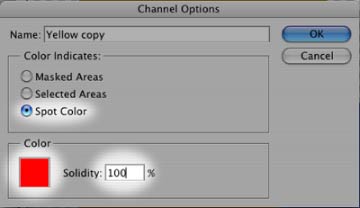
Double click on the Yellow Copy channel. The window Channel Options will show up. Make sure that where it says Color Indicates you choose Spot Color and that you have set the solidity to 100%. Then click onto the red square under the word Color.

When the Color Picker windows shows up, click on Custom. This will open another window called Custom Colors. In the drop down menu Book you can choose which set of colors to use. In this case choose PANTONE solid coated. Choose Pantone Orange 021 C and press OK.

Photoshop will go back to the New Spot Channel window. You will notice that the name of your spot channel has become PANTONE Orange 021 C, whereas before it was simply named with a generic “New Spot Channel.”

Press OK.

The colors of your image might change again. Once again, don’t worry about it, yet. Now go back to your Channels palette. Click on the eye next to the spot channel which you have just created in order to hide it. Click on the CMYK thumbnail on top of the Channels palette so you see all of your colors as they were before. Select the orange star. Make the spot channel visible again and hide the CMYK channels. Your image will be black and white to indicate that you are only working on one channel.

4. Trapping

Go to Select > Inverse to inverse the selection. Make sure you have selected the spot channel and press delete or backspace to clear everything outside the star. You should be left with a black star now.

Go to Select > Inverse again in get back your original selection. Now click on the CMYK thumbnail so that all of the CMYK channels show up again and hide your spot channel. Make sure you still have your star selection active. Press delete or backspace to delete the star. Now make your spot channel visible again. Et voila! Your star is now Pantone Orange 021 C.

You might notice that the there is some very tiny space with no color between the borders of the star and the ones of the other shapes. If that is the case, then it might show up when you print your file. So hide all of your CMYK channels again and make sure that only your spot channel is visible.

Your star will turn black again. You can simply select it with your Magic Wand. Now, go to Select > Modify > Expand.
When the Expand Selection window shows up, type in the number 1 in the Expand by: _ pixels field. Press OK.
Now with your color picker, click on the star.

Choose the Brush Tool.

Make sure it’s a big brush and it’s a solid brush (no feathered edges). With your selection still active, paint around the edges of the star. You are basically painting that extra pixel with the spot color of the star.

Once you are done, make the CMYK channels visible, together with the spot channel. All the colors should touch each other perfectly.

What you have just done is called trapping.

5. Creating Spot Channels in Photoshop

And what if I just want to create a new shape into Photoshop and fill it with a spot color? You can obviously do that as well.

Let’s take our star, square and ellipses again.

Go to the Channels palette menu and choose New Spot Channel.

Here you can choose your spot color the same way you have chosen it before. Use the same settings as I have explained to you earlier.

Let’s say you want to draw a square with your new spot color. You just need to make sure that the only channel that is selected is the one with your spot color, this way whatever painting you do or whatever shapes you make will have the spot color.

Note that when you have selected your spot channel, your foreground and background colors in the Tools palette will only be black, white or shades of gray. That is because you are working only on 1 color, i.e. your spot colors, where black indicates the maximum intensity of your spot color and white indicates the total absence of it. Gray indicates a tint of your spot color.

6. Saving an Image with Spot Colors

Once you have done all this you need to save your image in a suitable file format, which is either TIFF or DCS (Desktop Color Separations).

Once you import the TIFF or DCS file into a layout application also the spot color will be imported.

If you have a layout application that supports PSD files, such as InDesign, then you can also save your file into a PSD.

There is much more to learn, but it would require a lot of time to explain everything.

With this article you have got the basics of how to work with spot colors in Photoshop.

This article has been reproduced in its complete form by kind permission of graphic designer Elisabetta Bruno.


Related Posts

  • How to Design an Alien Head Logo | Photoshop Tutorial
  • How To Design A Pencil | Photoshop Tutorial
  • How to create Metal Text with Bloodstain effect | Photoshop Tutorial
  • How to create Rusty Text with Holes | Photoshop Tutorial
  • How to create Glossy Buttons | Photoshop Tutorial
  • How to create a content box in Photoshop | Photoshop Tutorial
  • How to create a Disney Navigation Interface Design | Photoshop Tutorial
  • How to create a Professional Blog Template Design | Photoshop Tutorial
  • How To Design Custom Fitted Logos | Photoshop Tutorial
  • How to create a Futuristic Logo Design | Photoshop Tutorial
  • How to Design a Metallic Content Box | Photoshop Tutorial
  • How to create a Clipboard Design | Photoshop Tutorial
  • How to create an Industrial Text Effect | Photoshop Tutorial
  • How to create an iRiver design | Photoshop Tutorial
  • How to create a Robot Head design | Photoshop Tutorial

Filed Under: Photoshop Tutorials Tagged With: How To Preserve Spot Colours in Photoshop, Photoshop Tutorial

Leave a Reply Cancel reply

Your email address will not be published. Required fields are marked *

Useful Site Links

Paper Sizes UK
Envelope Sizes UK
Glossary of Print Terms UK
Spot & Process Colours Explained
Legal Requirements - Stationery
Copyright Information
Trade Printing Service

Search the Site

Copyright © 2022 Castle Print & Design - all rights reserved

Bleeds explained

Basically, a bleed is artwork that goes over the edge of the printed sheet.

If your design needs to have a bleed then it’s important to allow 3mm overlap (see image A below). As the letterhead will be printed on oversize material (SRA4), this gives the guillotine operator a chance to cut into the artwork and produce a good finished letterhead. (see image B below).

A
How to design a letterhead fig. 3
B
How to design a letterhead fig. 4

Why do we need a bleed?

If the artwork ended at the edge of the sheet and the guillotine cut was only 0.5mm out, then we could end up with an unsightly thin white strip down one edge of the sheet, which is not ideal.

Also, if there is a large stack of paper on the press, with the best will in the world there will be the odd sheet that doesn’t get fed through the press 100% accurately so if a bleed hasn’t been put in place this could cause issues.

Extending the artwork over the edge of the sheet allows for a little leeway when it comes to the time for trimming.

If you’ve set your workspace for A4 and intend to use bleeds then, depending on what software package you are using you may need to set the workspace to oversize A4 (SRA4), which measures 225mm x 320mm.

We use cookies to ensure that we give you the best experience on our website. If you continue to use this site we will assume that you are happy with it.Ok