Castle Print & Design

Commercial printing for businesses throughout the UK & Europe.

  • E-mail
  • Facebook
  • business-cards-icons-Bonne Maman Logo
  • business-cards-icons-Ecover_logo
  • business-cards-icons-EPC_logo
  • business-cards-icons-FF-logo
  • business-cards-icons-halle-logo
  • business-cards-icons-harley
  • business-cards-icons-Hipp
  • business-cards-icons-HMV
  • business-cards-icons-jet2
  • business-cards-icons-LIB
  • business-cards-icons-Littlewoods
  • business-cards-icons-Marks__and__Spencer
  • business-cards-icons-marley
  • business-cards-icons-Mencap
  • business-cards-icons-NHS
  • business-cards-icons-RD_LOGO
  • business-cards-icons-samsung
  • business-cards-icons-Seat
  • business-cards-icons-Tesco
  • business-cards-icons-The_Open_University
  • business-cards-icons-thyssen-krupp
  • business-cards-icons-vbulletin
  • business-cards-icons-Vodafone
  • Home
  • Select A Product
    • Booklet Printing
    • Brochures & Leaflets
    • BUSINESS CARDS >> select for more options
      • Shaped Business Cards (die cut)
      • Laminated Business Cards
      • Spot Colour Business Cards
      • Spot UV Business Cards
      • Thermo Business Cards
    • Canvas Prints by Migglet
    • Continuous Stationery
    • Digital Printing Service
    • Envelope Printing
    • Folder Printing
    • Forms Printing (NCR)
    • Label / Sticker Printing
    • Letterhead Printing
    • Wedding Stationery
  • Other site info
    • About Us
    • Artwork & Design
    • Copyright Information
    • Envelope Sizes UK
    • FAQ’s
      • Artwork – FAQ’s
      • Business Cards – FAQ’s
      • General – FAQ’s
    • Glossary of Printing Terms UK
    • Legal requirements for your stationery – Page 1
      • Legal requirements for your stationery – page 2
    • Paper Sizes UK
    • Privacy
    • Setting up your office to use continuous forms
    • Sitemap
    • Stock Photos
    • Trade Printing
    • Write For Us
  • Articles & Tutorials
    • PRINT ARTICLES >>
      • 11 Benefits of Online Printing Services
      • Are Your Labels Selling Your Brand?
      • Booklet Printing & Publishing | Booklet Planning
      • Building Business Presence with Digital Printing
      • Business Brochure Printing: Picking The Perfect Paper
      • Choosing The Right Business Card Material
      • Colour Issues | Working in Spot & Process Colour
      • Digital, or Litho – How Do I Choose?
      • Fonts & Typefaces Explained
      • Free Business Cards – a bargain right?
      • How To Apply Printed Vinyl | Wet & Dry Methods
      • How to Design and Print Your Own Business Card Using ‘Pages’
      • How to Design a Photo ID Card that Reduces Card Cloning Attempts
      • How Visual Retail Merchandising Catches Your Attention in 2018
      • Logo Design
      • Print vs Digital Media – The Death of Print?
      • Print Technology
      • Proof That Print Is Not Dead | Most Consumers Still Prefer Print on Paper
      • QR Code Printing
      • Rich Black Explained | Using Rich Blacks In Your Artwork
      • Setting Up Your Office To Use Continuous Forms
      • Spot and Process Colours Explained
      • Thermo Process Explained
      • Understanding The Importance of Business Printing For Brand Promotion
      • Website Design
      • Web Design to Print Design – Making The Transition
      • What Makes A Logo Stand The Test of Time?
    • PRINT TUTORIALS >>
      • How To Design A Ghost Image
      • How To Design An A4 Folded Leaflet
      • How to Design a Business Card
      • How to design a Letterhead
      • Preparing A Print File In Adobe In-Design
      • How To Design A Pull Up Banner In Adobe InDesign
      • Text to Outlines – how to convert text into outlines
    • PHOTOSHOP HOW TO >>
      • How to Design an Alien Head Logo
      • How To Design A Pencil
      • How To Create Metal Text With Bloodstain Effect
      • How To Create Rusty Text with Holes
      • How to create Glossy Buttons
      • How to create a simple, clean content box
      • How To Preserve Spot Colours in Photoshop
      • How to create a Disney Navigation Interface Design
      • How To Design Custom Fitted Logos
      • How to create a Futuristic Logo Design
      • How to Design a Metallic Content Box
      • How to create a Clipboard Design
      • How to create an Industrial Text Effect
      • How to create an iRiver design
      • How to create a Professional Blog Template Design
      • How to create a Robot Head design
    • REVIEWS >>
      • Buying & Selling Art | ArtShowcase Review
      • Top 10 Best All In One Laser Multi-Function Printers
Home Articles & Tutorials Rich Black explained, and when to use it.

August 20, 2015 By castle Leave a Comment

Rich Black explained, and when to use it.

Materials used for printing absorb ink at different rates. A standard 120gsm letterhead stock is more absorbant than say a business card board, where the ink tends to ‘sit’ on the surface.

Gloss materials, or coated stock also provide a good base for inks to sit and have the added benefit of reflecting light back through the ink, making the artwork look punchier.


The effect is even more profound on laminated business cards, and the plastic laminate again helps to reflect light and consequently enhance the artwork.
rich blacks 4 colour modelMaterials used for letterheads, compliment slips, invoices (NCR, or no carbon required) however are much more absorbant, and colours (ink) tend to soak into the material, often leaving them with a slightly washed-out effect.

On a 2 colour press, let’s say we have red and black being printed on a letterhead. The machine operator can control the pressure of the individual ink rollers and control the flow of ink onto the paper. So, if the black looks a little weak he can apply more roller pressure to give a denser black print.

Ok, so far so good.

Now if we switch to a different situation where we need to print a letterhead using a 4 colour (CMYK) process then things aren’t so straightforward.

Ok, we’re now using a 4 colour press, and we have a letterhead that has a couple of full colour (CMYK) trade logos for example plus the usual text printed in black.

Although the press operator still has total control over each of the 4 printing units, he has to take much more care. As all the colours on the letterhead are being printed using a combination of Cyan, Magenta, Yellow & Black should the press operator decide to put the black down stronger (to give more impact to the text) then all the other elements on the page will also be affected by this adjustment (as a percentage of black will also be used in the other colours) and things will rapidly start to look out of balance. This means his options are pretty limited.

Now it’s natural to assume (and this is a common mistake) that when creating the artwork we select 100% black (see fig. 1 below) and no other colour, for our text on the letterhead.

Unfortunately, this will leave our black text looking washed-out, or look as though it’s been printed in a dark grey. On seeing this, the end user may rush to the phone and complain to the printer of ‘bad print’, or a similar phrase not repeatable here!
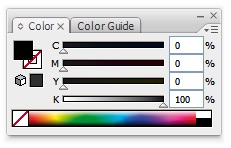
rich black colour swatch 1
fig. 1

This is exactly where we need a ‘rich black‘, or a black that has other colour added to it to give a denser effect.

Note: although black may look black onscreen it has to be remembered a colour monitor, which uses Red, Green & Blue to display colours, shows colours in a much more vibrant way, due to the backlighting process.

Rich Black

So, what combination in percentages of colour do we use? Well, it’s probably best you check with your preferred printer and ask what values you should use to create a rich black for his system.

Some will tell you to use 100% black, and 65% of all other colours as below:.
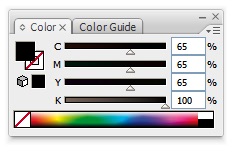
rich black colour swatch 2
fig. 2

We also get good rich black results from using 100% of all 4 colours, as below:
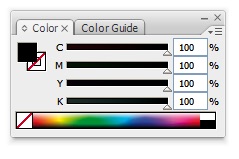
rich black colour swatch 3
fig. 3

Using just 100% black in a 4 colour job is an easy mistake to make, especially as a monitor won’t show you what really happens to ink once it hits the paper.

One thing worth pointing out . . . you won’t be able to see any difference onscreen between a regular black and rich black, but when the job gets to print, then the difference will be more obvious.


If you’re interested in learning how to create ‘warm’ and ‘cool’ blacks in your artwork (using different colour combinations) then see this informative page at Wikipedia.

We hope the above has helped in some way.

Filed Under: Articles & Tutorials Tagged With: cool black, rich black, rich blacks, warm black

Leave a Reply Cancel reply

Your email address will not be published. Required fields are marked *

Useful Site Links

Paper Sizes UK
Envelope Sizes UK
Glossary of Print Terms UK
Spot & Process Colours Explained
Legal Requirements - Stationery
Copyright Information
Trade Printing Service

Search the Site

Copyright © 2022 Castle Print & Design - all rights reserved

Bleeds explained

Basically, a bleed is artwork that goes over the edge of the printed sheet.

If your design needs to have a bleed then it’s important to allow 3mm overlap (see image A below). As the letterhead will be printed on oversize material (SRA4), this gives the guillotine operator a chance to cut into the artwork and produce a good finished letterhead. (see image B below).

A
How to design a letterhead fig. 3
B
How to design a letterhead fig. 4

Why do we need a bleed?

If the artwork ended at the edge of the sheet and the guillotine cut was only 0.5mm out, then we could end up with an unsightly thin white strip down one edge of the sheet, which is not ideal.

Also, if there is a large stack of paper on the press, with the best will in the world there will be the odd sheet that doesn’t get fed through the press 100% accurately so if a bleed hasn’t been put in place this could cause issues.

Extending the artwork over the edge of the sheet allows for a little leeway when it comes to the time for trimming.

If you’ve set your workspace for A4 and intend to use bleeds then, depending on what software package you are using you may need to set the workspace to oversize A4 (SRA4), which measures 225mm x 320mm.