business cardsAbout usRequest a quotationFAQsContact usSearch siteLinksbusiness cards
link to homepage
lbordertop
menu bar icon

1x1

Photoshop Tutorials UK

menutop

menudiv

To quickly find the product, article, tutorial or other site info you require, please use the search facility below.


menudiv

If your enquiry is urgent, we can quickly be contacted on:

01635 255 552

menuclose
11-1
392head

Rust holes with text effect created in Photoshop

1x1

Rust with Holes Text Effect.

Photoshop Tutorial Pic 1

Step 1:

Let's start out by creating a new file. I used a 500x200 pixels canvas set at 72dpi, and I filled my background with a white colour. Now create a new layer set and name it 'Text Design'.

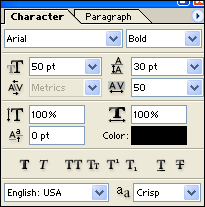
Select the Horizontal Type Tool and set the font family to Arial, bold, 50 pt, crisp and black as the shade of colour. Then open up the character palette and add the settings below:

Photoshop Tutorial Pic 2

Step 2:

In a new text layer type out your text.As you can see, in this tutorial we've used 'Welcome to castleprint.co.uk'.

Photoshop Tutorial Pic 3

Step 3:

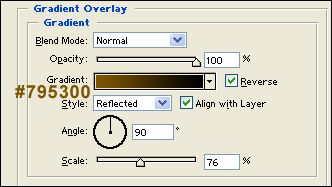
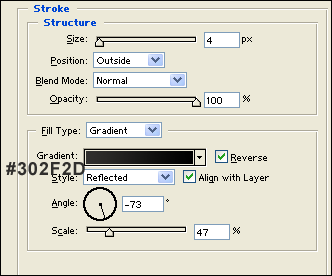
Under Layer Style (Layer > Layer Style) add a Gradient Overlay and Stroke blending options to your text layer.

Photoshop Tutorial Pic 4

Photoshop Tutorial Pic 5

Photoshop Tutorial Pic 6

Step 4:

Duplicate your first text layer and delete the layer styles attached by right clicking on the text layer under the layers palette and choose 'Clear Layer Style'. With the second black text layer, nudge it up and to the left by a little.

Photoshop Tutorial Pic 7

Step 5:

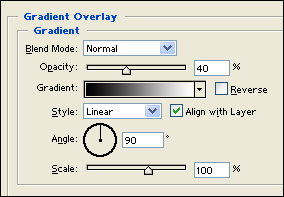
Under Layer Style (Layer > Layer Style) add a Gradient Overlay blending option to your second black text layer.

Photoshop Tutorial Pic 8

Photoshop Tutorial Pic 9

Step 6:

Now Add another text layer with your text with a white colour shade.
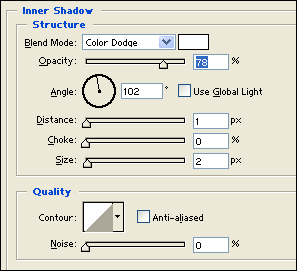
Photoshop Tutorial Pic 10

Step 7:

Under Layer Style (Layer > Layer Style) add an Inner Shadow, Inner Glow, Satin and Gradient Overlay blending options to the white text layer. Then set the layers blending mode to Darken so the layer styles design appears on the text.

Photoshop Tutorial Pic 11

Photoshop Tutorial Pic 12

Photoshop Tutorial Pic 13

Photoshop Tutorial Pic 14

Photoshop Tutorial Pic 15

Step 8:

Once again add another text layer with white colour shade.
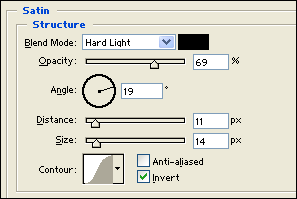
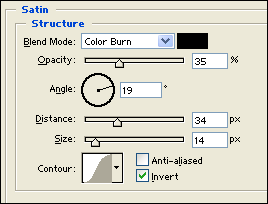
Photoshop Tutorial Pic 16

Step 9:

Under Layer Style (Layer > Layer Style) add a Satin and Gradient Overlay blending options to your text layer from step eight. Then set the layers blending mode to Soft Light.

Photoshop Tutorial Pic 17

Photoshop Tutorial Pic 18

Photoshop Tutorial Pic 19

Step 10:

Create a new layer and draw a random white shape with some sharp edges. Roughly like the picture shown below.
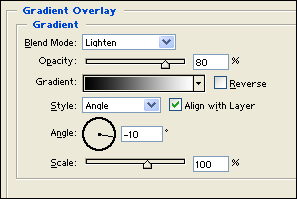
Photoshop Tutorial Pic 20

Step 11:

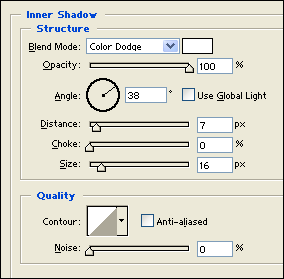
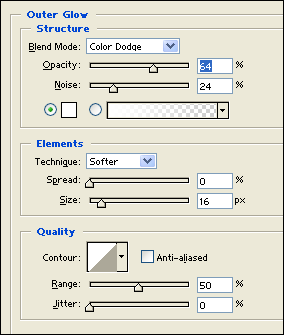
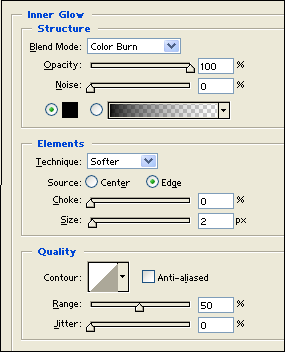
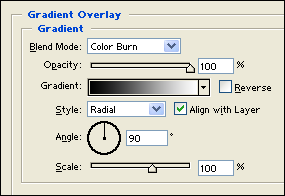
Under Layer Style (Layer > Layer Style) add an Inner Shadow, Outer Glow, Inner Glow and Gradient Overlay blending options to your white shape layer. Then set the layers blending mode to Darken.

Photoshop Tutorial Pic 21

Photoshop Tutorial Pic 22

Photoshop Tutorial Pic 24

Photoshop Tutorial Pic 25

Photoshop Tutorial Pic 26

Step 12:

Now just duplicate the shape layer from the last steps for more holes, just randomly add holes on your text.

Photoshop Tutorial Pic 27

Result:

Rust with Holes Text Effect.

Photoshop Tutorial Pic 28

Other Photoshop Tutorials

Hopefully, the above tutorials have been of some help so please let us know how we're doing by leaving a message in the comments section below.

Would you like to see new Photoshop tutorials on a regular basis? Are you interested in Adobe Illustrator tutorials? Please let us know!

Designers!

Are you a designer? If so, would you like to contribute to our site in return for some promoted links back to your site?

Whether it's a tutorial using your favoured software, logo design, web design or you have some useful general design tips, then we'd love to hear from you. Providing your content is unique, i.e. not published elsewhere, then I'm sure we can come to an arrangement whereby we both benefit.

If so, please drop me a private message here: PM to Paul

HTML Comment Box is loading comments...


Add to Google
Add to My Yahoo!
AddThis Social Bookmark Button


Creating a rust effect with holes in Photoshop

General Enquiry Form
If you experience any difficulty in submitting this form, please contact us on:
01635 255 552 or email us at: sales@castleprint.co.uk and we will respond asap.


Required items indicated with *
Email: *
Name: *
Tel. Number: *
Subject: *

I would like more information. Contact me on the above telephone number to discuss my enquiry
  Telephone me on the above number

My enquiry relates to:
  General printed products   Artwork & Design

I wish to receive samples of the following products. Please note: if you need to select more than one option, please enter the extra product you require in the message box further down this form.
Samples:
Laminated / Plain Business Cards
Letterheads / Compliment Slips
Printed Envelopes - 1, 2, 3 or 4 colours
Full Colour Brochures & Flyers
My address details:

Any other details not covered above:

Attach Files - 5Mb max
 
Attach Files - 5Mb max
 
If your file(s) are over 5Mb, please contact us and we will supply an alternative email address.  
Please check that you have entered all details correctly, to ensure we deal with your enquiry in an efficient manner.

Castle Print & Design
in partnership with The Roman Group, Centurion House, Woodside Road, Southbourne, Bournemouth, Dorset, BH5 2BA

Tel: 01635 255 552 / FreeFax: 0800 389 7262


1x1
11-2
176head1

1x1

Photoshop Tutorials

1x1
1x1   1x1
Checklist

Remember, if designing for print, set your workspace to 300dpi and at actual size to be used, or larger. Many people use higher resolutions, 600dpi for instance, but this is not necessary, and will not improve the final print quality.

If designing just for the web, then a 72dpi workspace is fine.

Another thing to consider - if designing for print, then make sure 'Mode' is set for CMYK.

Insert > Mode > CMYK

Only use RGB mode if designing for the web.

 
rbordertop
footer1
footer3

visa-sm spacerTelephone: 01635 255 552spacerrorinfospacerFreeFax: 0800 389 7262 spacermastercard-sm

footer4
footer2