
How to create a Robot Head design
Step 1:
Let’s start out by creating a new file. I used a 500×400 pixels canvas set at 72dpi, and I filled my background with #004E80 color shade. Now make a new layer set and name it ‘Robot Head’. Then in a new layer draw an ellipse with #87FFFF color shade and 67 x 44 px dimensions.

Step 2:
Under Layer Style(Layer > Layer Style) add a Gradient Overlay blending option to your ellipse layer.

Result:

Step 3:
In a new layer draw a large light blue ellipse with #6BC6FF color shade and 116 x 118 px dimensions, position it as shown below.

Step 4:
Under Layer Style(Layer > Layer Style) add an Shadow, Inner Glow and Gradient Overlay blending options to your large light blue ellipse layer.
Result:
Step 5:
In a new layer draw a large black ellipse with the same size as the light blue ellipse.

Step 6:
Under Layer Style(Layer > Layer Style) add an Shadow and Satin blending options to your large black ellipse layer. Then set the layer’s blending mode to Lighten.
Result:
Step 7:
In a new layer draw a white circle with 36 x 36 px dimensions, this will be part of the eye. Then under Layer Style(Layer > Layer Style) add a Drop Shadow, Gradient Overlay and Stroke blending options.
Result:

Step 8:
In a new layer draw a small black circle then draw a white circle inside.

Step 9:
Now add the right eye by duplicating the original designs.

Step 10:
In a new layer draw a blue ellipse with #004E80 color shade and 28 x 13 px dimensions on the head.

Step 11:
Under Layer Style(Layer > Layer Style) add a Drop Shadow, Inner Shadow and Gradient Overlay blending options to the blue ellipse layer.
Result:

Step 12:
In a new layer draw a small white ellipse inside the blue ellipse design.

Step 13:
Now draw 4 small black rounded rectangles in seperate layers as shown below. Then set the layer’s opacity level of the bottom rounded rectangles to 62% and 45%.

Step 14:
Now merge down your ‘Robot Head’ layer set through Layer > Merge Layer Set. Then under Layer Style(Layer > Layer Style) add Shadow and Inner Glow blending options to your Robot Head layer.
Result:

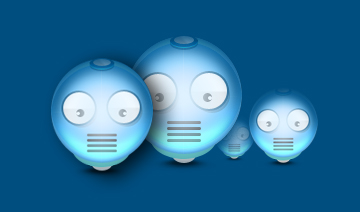
Final Results:
How to create a Robot Head design


Leave a Reply