business cardsAbout usRequest a quotationFAQsContact usSearch siteLinksbusiness cards
header
lbordertop
176head

1x1

Photoshop Tutorials

menutop
nb
menudiv
nb
menudiv
nb
menudiv
nb
menudiv
nb
menudiv
nb
menudiv
nb
menudiv
nb
menudiv
nb
menudiv
nb
menudiv
nb
menudiv
nb


Please use QuickSearch Menu top right for more options

menuclose
372div-trans-176
372div-trans-176
11-1
392head

1x1

A metal with blood stain text effect created in Photoshop

1x1

1x1

Metal with Blood Stain effect

Blood stain metal effect pic 1

Step 1:

Let's start out by creating a new file. I used a 800x300 pixels canvas set at 72dpi, and I filled my background with a black colour. Now create a new layer set and name it 'Blood Stain Text Effect'.

Select the Horizontal Type Tool and set the font family to Berlin Sans FB, bold, 64 pt, strong and black color shade. In a new text layer type your name or the text you want to decorate.

Blood stain metal effect pic 2

Step 2:

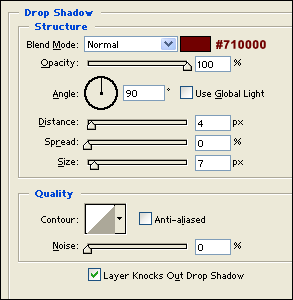
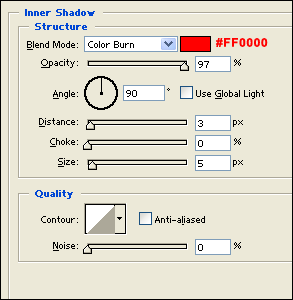
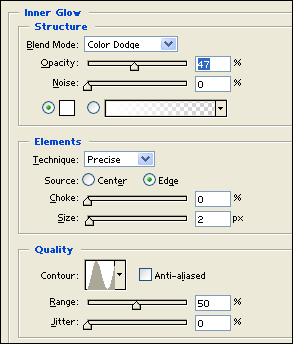
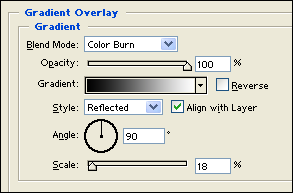
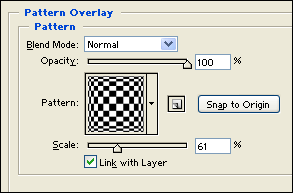
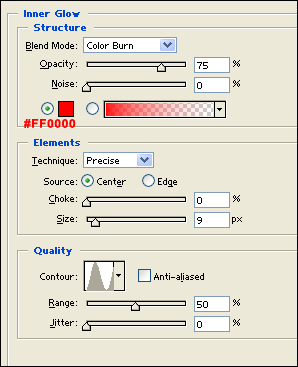
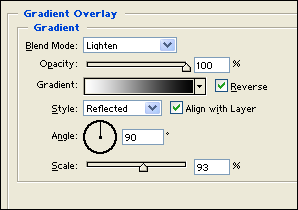
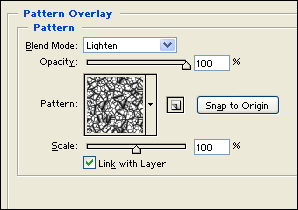
Under Layer Style(Layer > Layer Style) add a Drop Shadow, Inner Shadow, Inner Glow, Gradient Overlay and Pattern Overlay blending options to your black text layer.

Blood stain metal effect pic 3

Blood stain metal effect pic 4

Blood stain metal effect pic 5

Blood stain metal effect pic 6

Blood stain metal effect pic 7

Step 3:

With all that blending option added to your text layer, it should now look like this:

Blood stain metal effect pic 8

Step 4:

Now in a new text layer type your name with a white color shade.

Blood stain metal effect pic 9

Step 5:

Under Layer Style(Layer > Layer Style) add an Inner Glow, Gradient Overlay and Pattern Overlay blending options to your white text layer. Then set the layers blending mode to Darken.

Blood stain metal effect pic 10

Blood stain metal effect pic 11

Blood stain metal effect pic 12

Blood stain metal effect pic 13

Results:

Metal with Blood StainText Effect.

Blood stain metal effect pic 14

If you found the above Photoshop tutorial helpful, please help to share this with others by using the 'digg' button below.
 
Add to Google
Add to My Yahoo!
   
Add to My AOL
   
AddThis Social Bookmark Button

Other Photoshop Tutorials

Designing an Alien head logo
Metal with Blood Stain effect
Design a Pencil
How to create Glossy Buttons in Photoshop
How to create Metallic, Rusty effects, with Holes
A simple, clean Content Box
Preserving Spot Colours in Photoshop
A Professional Blog Template Design created in Photoshop
A Disney.com style Navigation Interface
A Custom-Fitted Logo
A Futuristic Logo created in Photoshop
A Metallic Content Box created in Photoshop
Designing a Clipboard icon in Photoshop
Creating an Industrial Text Effect in Photoshop
An iRiver design
A fun Robot head design in Photoshop
 
SEE ALL PHOTOSHOP TUTORIALS HERE

moreinfo-back return to previous pagespacer

Page copy protected against web site content infringement by Copyscape

1x1
11-2
176head1

1x1
Photoshop Tutorials
1x1
1x1

QuickSearch Menu
spacer

1x1
Checklist

Remember, if designing for print, set your workspace to 300dpi and at actual size to be used, or larger. Many people use higher resolutions, 600dpi for instance, but this is not necessary, and will not improve the final print quality.

If designing just for the web, then a 72dpi workspace is fine.

Another thing to consider - if designing for print, then make sure 'Mode' is set for CMYK.

Insert > Mode > CMYK

Only use RGB mode if designing for the web.


156div
 
1x1
rbordertop
footer1
footer3

spacervisa-sm spacerTelephone: +44(0)1635 522447spacerrorinfospacerFax: +44(0)1635 522449 spacermastercard-smbusiness cards ukhelp pages

footer4
footer2